Last updated: August 8, 2025
Best Presentation Clickers to Ace Your Next Speech
Enhance Your Stage Presence with The Best Presentation Remotes
Behind every powerful presentation lies a seamless and confident delivery, and the right wireless presentation clicker can be the secret weapon of every skilled public speaker. We explore the top-notch presentation remote clickers that elevate speeches, PowerPoint slides, or Google Slides. Our top pick for the best presentation clicker is Logitech – R500s Presenter Bluetooth and USB Remote Control.
A professional clicker can help a teacher engage their students, a salesperson to close the sale, and a public speaker to captivate their audience by allowing users to advance slides effortlessly while leaving a lasting impression.
Quick Picks - Presentation Clicker
Editor's Choice

Logitech - R500s Presenter Bluetooth and USB Remote Control - Graphite
Runner- up

Logitech - R400 Presenter Remote Control - Black
Best Value

Targus Wireless Presenter
FTC Disclosure: Bad Grammarian may receive compensation from the companies whose courses and products we showcase with no added cost to you. We only partner with the very best and most reputable companies. Bad Grammarian is independently owned, and the opinions expressed here are our own.
Presentation Clicker Detailed Product Reviews
Editors Choice: Logitech R500s Presenter
Introducing the Logitech R500s – the ultimate plug-and-play presentation remote designed to elevate your public speaking experience. With an impressive operating range of up to 20 meters (65 ft), this remote offers the freedom to move and engage your audience effortlessly.
The R500s’ user-friendly three-button design ensures seamless slide navigation, while its ergonomic and secure grip feels comfortable in your hand, allowing you to focus on your delivery.
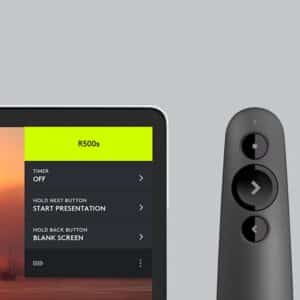
Choose between dual connectivity options—USB receiver or Bluetooth low-energy technology—to effortlessly connect the R500s to your computer. A built-in dock ensures convenient storage for the tiny USB receiver when not in use. This is certainly one of the top Bluetooth remotes on the market.
With the R500s remote, you won’t have to worry about battery life, as it runs on a single AAA battery for up to 12 months. And when power is low, the R500s smartly enters a power-saving mode, disabling the laser to extend battery life, allowing you to continue presenting confidently for an additional week.
Moreover, the R500s is a more sustainable choice, it is certified carbon neutral, reducing the carbon impact of the product and packaging to zero. Embrace the power of precision and control with the Logitech R500s, it genuinely empowers your speaking engagements.
PROS
- Long Operating Range: Navigate slides and laser point from up to 20 meters away.
- Universal Compatibility: Works with Windows, Mac OS, iOS, Android, and leading presentation software.
- It runs for up to 12 months on a single AAA battery, with a power-saving mode to extend battery life.
CONS
- Primary slide navigation – may lack advanced features that some users may require for more complex demonstrations.
- Bluetooth clickers might experience occasional connectivity issues, leading to interruptions during presentations.
- The compact design may not fit comfortably in larger hands, and the three-button layout might feel restrictive.
Runner Up: Logitech – R400 Presenter Remote Control
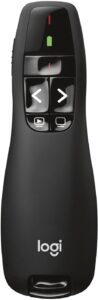
The presenter’s red laser pointer stands out against most backgrounds, directing attention to your key points precisely and clearly.
The freedom of the 2.4 GHz wireless technology allows you to move around the room, interact with your audience, and create a powerful impact that leaves a lasting impression. The battery indicator lets you check power levels at a glance.
With a plug-and-play wireless receiver, there’s no need for additional software, making setup quick and hassle-free. When you are done, the receiver can be conveniently stored inside the presenter for easy packing and portability.
Best Value: Targus Wireless Presenter Remote
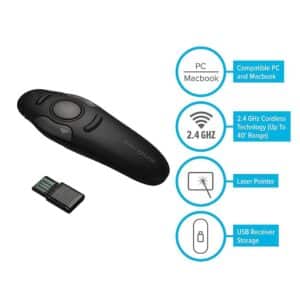
With the built-in laser pointer, you can effortlessly emphasize critical points. Other keys enable you to page up, page down, switch applications, darken the screen, and resume, all at your fingertips.
The presenter’s preset RF connection guarantees true plug-and-play capability, eliminating the need for additional drivers. Elevate your presentations confidently and precisely using the Targus Wireless Presenter with Laser Pointer, and experience seamless control at your fingertips.
Additional Presentation Clicker Recommendations
Logitech – Spotlight Presentation Remote
Enjoy the freedom of movement with an impressive wireless range of up to 100 feet, thanks to Bluetooth Smart connectivity and USB receiver compatibility, making it ideal for large venues and interactive demonstrations.
It works effortlessly with Windows and Mac platforms, supporting popular software like Powerpoint, Keynote, Google Slides, and Prezi.
Experience a new level of versatility with the advanced pointer system powered by Logitech Presentation Software. Highlight and magnify on-screen content like never before, enabling you to engage your audience with captivating visuals.
Worried about battery life? Fear not, as the Spotlight remote boasts a fast recharging capability, providing 3 hours of presenting after just 1 minute or a full charge in as little as 60 minutes, which can last up to an impressive three months. Elevate your speeches to a new dimension with the Logitech Spotlight presentation remote and captivate your audience like never before.
Microsoft – Presenter+
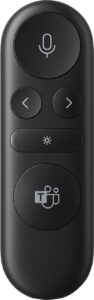
With integrated mute control and status light, you can avoid the dreaded “you’re on mute” moments, ensuring seamless communication during meetings. The integrated Microsoft Teams button lets you quickly join conversations and raise your hand when ready to contribute.
How to Choose the Perfect Presentation Clicker
Not all presentation remotes are created equal. The right clicker can transform your presentations from awkward slide-shuffling moments into smooth, confident deliveries. Here’s your complete guide to finding the perfect wireless presenter for your specific needs.
Consider Your Presentation Environment
Room Size and Operating Range
Your presentation space determines the range you’ll need from your remote clicker:
- Small meeting rooms (10-15 people): 10-15 meter range is sufficient. Budget-friendly options like the Targus Wireless work perfectly.
- Medium conference rooms (15-50 people): Look for 15-20 meter range. The Logitech R400 or R500s are ideal choices.
- Large auditoriums (50+ people): You’ll need 20+ meter range. Consider the Logitech R500s or Spotlight for maximum freedom of movement.
- Mixed environments: If you present in various venues, invest in a longer-range model for maximum versatility.
Lighting Conditions
The visibility of your laser pointer depends on your typical presentation environment:
- Bright rooms or screens: Red lasers work well for most situations and are the standard choice.
- Very bright environments: Consider models with stronger laser output or digital highlighting features like the Microsoft Presenter+.
- Mixed lighting: Advanced models like the Logitech Spotlight offer digital highlighting that works in any lighting condition.
Connectivity and Compatibility Requirements
USB vs. Bluetooth Connection
Your device compatibility and personal preferences determine the best connectivity option:
USB Receivers (Plug-and-Play):
- ✅ Works instantly with any computer
- ✅ No pairing required
- ✅ Generally more reliable connection
- ❌ Uses up a USB port
- ❌ Easy to lose the tiny receiver
Bluetooth Connectivity:
- ✅ No USB port required
- ✅ Works with tablets and smartphones
- ✅ Nothing extra to carry or lose
- ❌ Requires pairing setup
- ❌ Potential connectivity issues
Our Recommendation: Choose dual connectivity (USB + Bluetooth) if your budget allows. The Logitech R500s offers both options, giving you maximum flexibility.
Device and Software Compatibility
Ensure your chosen clicker works with your presentation setup:
- Windows computers: All major brands are compatible
- Mac computers: Most clickers work, but verify specific model compatibility
- iPads/Android tablets: Requires Bluetooth-enabled models
- Presentation software: PowerPoint, Keynote, Google Slides, and Prezi are universally supported
- Microsoft Teams/Zoom: Consider the Microsoft Presenter+ for integrated meeting controls
Essential Features to Evaluate
Battery Life and Power Management
Nothing ruins a presentation like a dead clicker battery. Consider these factors:
- Frequent presenters: Look for 12+ month battery life (Logitech R500s excels here)
- Occasional use: 6-8 months is acceptable (Logitech R400, Targus Wireless)
- Heavy users: Consider rechargeable options like the Logitech Spotlight
- Travel presenters: Models with power-saving modes and battery indicators are essential
Pro Tip: Always carry spare batteries, regardless of your clicker’s battery life rating.
Button Layout and Ergonomics
Comfort during extended presentations is crucial:
- Simple presenters: 3-button layout (forward/back/laser) like the R500s
- Feature-rich users: 5-6 buttons for additional controls (Targus Wireless, R400)
- Hand size considerations: Test grip comfort if possible
- Button placement: Ensure easy access without looking down
Budget Considerations
Price Ranges and Value
Presentation clickers span various price points, each offering different value propositions:
Budget Range: $15-25
Best Choice: Targus Wireless Presenter
Good for: Occasional presenters, students, basic meeting rooms
Features: Essential functions, decent range, reliable performance
Mid-Range: $25-50
Best Choices: Logitech R400, Logitech R500s
Good for: Regular presenters, business professionals, versatile use
Features: Extended range, dual connectivity, long battery life
Premium Range: $60-100+
Best Choices: Microsoft Presenter+, Logitech Spotlight
Good for: Professional speakers, advanced features needed, frequent travel
Features: Advanced highlighting, software integration, premium build quality
Special Use Case Considerations
For Teachers and Educators
- Prioritize durability and long battery life
- Choose models with intuitive button layouts
- Consider classroom-specific features like screen blanking
- Recommended: Logitech R400 or R500s
For Sales Professionals
- Professional appearance is crucial
- Need reliable performance in various environments
- Advanced features can enhance presentations
- Recommended: Logitech R500s or Spotlight
For Conference Speakers
- Extended range for large venues
- Reliable connectivity is non-negotiable
- Professional appearance and feel
- Recommended: Logitech Spotlight or R500s
Making Your Final Decision
To choose the perfect presentation clicker, ask yourself these key questions:
- Where do I present most often? (Determines range requirements)
- What devices do I use? (Determines connectivity needs)
- How often do I present? (Influences battery life importance)
- What’s my budget? (Narrows down options)
- Do I need advanced features? (Basic vs. premium models)
Quick Decision Guide:
- Most versatile choice: Logitech R500s (Our #1 recommendation)
- Best budget option: Targus Wireless Presenter
- For Microsoft Teams users: Microsoft Presenter+
- For premium features: Logitech Spotlight
- Classic reliable choice: Logitech R400
Remember, the best presentation clicker is the one that disappears into the background, allowing you to focus entirely on connecting with your audience and delivering your message effectively.
FTC Disclosure: Bad Grammarian may receive compensation from the companies whose courses and products we showcase with no added cost to you. We only partner with the very best and most reputable companies. Bad Grammarian is independently owned, and the opinions expressed here are our own.
| Feature | Logitech R500s (Editor's Choice) |
Logitech R400 (Runner Up) |
Targus Wireless (Best Value) |
Microsoft Presenter+ | Logitech Spotlight |
|---|---|---|---|---|---|
| Operating Range | 20m (65ft) | 15m (50ft) | 15m (50ft) | 10m (30ft) | 30m (100ft) |
| Battery Life | 12 months | 6 months | 8 months | 3 months | 3 months (Fast charge) |
| Connectivity | USB + Bluetooth | USB Only | USB Only | USB + Bluetooth | USB + Bluetooth |
| Laser Pointer | Red | Red | Red | Digital Pointer | Advanced Highlighting |
| Button Layout | 3 buttons | 5 buttons | 6 buttons | Teams integration | 3 buttons |
| Compatibility | Universal Win/Mac/iOS/Android |
Windows/Mac | Windows/Mac | Microsoft Focus Teams optimized |
Windows/Mac |
| Best For | Most Users Versatile & reliable |
Traditional Users Classic design |
Budget Conscious Great value |
Teams Users Meeting focused |
Professionals Premium features |
| Approximate Price | $40-50 | $25-35 | $15-25 | $60-70 | $80-100 |
Frequently Asked Questions (FAQs)
Conclusion
The Logitiech R500s presentation remote is perfect for presenters seeking a seamless and engaging experience. Its 20-meter operating range allows freedom of movement in medium to large-size rooms, while universal compatibility ensures effortless integration with various devices and popular software. Its intuitive three-button design, dual connectivity options, and long battery life make it the ultimate companion for confident and impactful presentations, setting presenters on a path to captivate audiences and leave a lasting impression.
Our #1 Presentation Clicker Recommendation